GoBarber - Mobile App with React Native
My class notes and code from the Rocketseat bootcamp, where we build a mobile app that consumes a Node.js API

Let's build GoBarber Mobile with React Native, which will consume the GoBarber Backend REST API in Node.js. We'll handle private routes, perform JWT authentication, and receive an auth token. The authenticated user will be stored in Redux so we can access the profile data anywhere we need the logged-in user. It differs from GoBarber Web because here we don't register providers — we only list providers and book appointments. This is the client app; the web one is the provider.
Lesson 01 - Project structure
To get started, let's create a project with the React Native CLI:
react-native init gobarberRNThen we grab the libs from GoBarber Web along with the configs and apply them to GoBarber Mobile. Check the commit to see what was done — it's similar to everything I've written in other React Native tutorials about structuring an application.
Code: https://github.com/tgmarinho/gobarberRN/tree/aula-01-estrutura-projeto
Lesson 02 - Configuring Root Import
Root Import, if you don't know, is a tool that lets us write imports more easily. For example:
Before:
import Card from '../../../../components/Card'With root import:
import Card from '~/components/Card'In other words, it makes imports much easier — we don't need to know the exact path, the tool handles it for us after a quick setup.
Let's install the two libs needed for the config:
yarn add babel-plugin-root-import eslint-import-resolver-babel-plugin-root-import -DIn React Native we have access to Babel's configuration; in Create React App we don't, which is why we used other setups like react-app-rewired.
In babel.config.js I add the babel-plugin-root-import plugin and point to the source folder:
module.exports = {
  presets: ['module:metro-react-native-babel-preset'],
  plugins: [
    [
      'babel-plugin-root-import',
      {
        rootPathSuffix: 'src',
      },
    ],
  ],
};
And in eslintrc.js:
...
 settings: {
    'import/resolver': {
      'babel-plugin-root-import': {
        rootPathSuffix: 'src',
      },
    },
  },
I also create a jsconfig.json file, which helps with file imports and lets you click through the import path to open the file:
{
  "compilerOptions": {
    "baseUrl": "src",
    "paths": {
      "~/*": ["*"]
    }
  }
}
Done — just test it by creating any component and using it inside App.js. The import and click-through should work.
Code: https://github.com/tgmarinho/gobarberRN/tree/aula-02-configurando-root-import
Lesson 03 - Auth routes
Let's set up the authentication routes, like we did in gobarber-react.
First, add the libs that manage routing:
yarn add react-navigation react-native-gesture-handlerThen install jetifier:
yarn add jetifier -DThen run:
yarn run jetifyJetify patches the libraries to the AndroidX architecture. (You may not need this anymore on React Native 0.61++.)
For React Navigation to work, we need to configure a Java file on the Android side, per the docs.
After that, run the command for whichever platform you're developing on:
react-native run-ios
react-native run-android
Now let's work on the routes. Create a routes.js file inside src.
import {createAppContainer, createSwitchNavigator} from 'react-navigation';

import SignUp from './pages/SignUp';
import SignIn from './pages/SignIn';

export default createAppContainer(
  createSwitchNavigator({
    SignIn,
    SignUp,
  }),
);
Then we create functional components SignIn and SignUp in the pages folder. That's all the setup — see the code for details.
When you run it, the text "SignIn" should appear in the top-left corner of your phone or emulator.
Code: https://github.com/tgmarinho/gobarberRN/tree/aula-03-rotas-auth
Lesson 04 - Configuring the Background
Let's start on the visual side of the app.
Install the lib:
yarn add react-native-linear-gradientYou only need to run this command if you're on macOS and emulating iOS — on Android you can skip it:
cd ios/ && pod install && cd..Now let's build the background:
Create the folder src/components/Background/ and inside it an index.js file with the following:
import LinearGradient from 'react-native-linear-gradient';
import styled from 'styled-components/native';

export default styled(LinearGradient).attrs({
  colors: ['#7159c1', '#ab59c1'],
})`
flex: 1;
`;
Nice and simple — we're just restyling a component with a color in the first position and another in the second, which produces a vertical gradient effect.
This Background component will be used on every screen.
Then just apply it to SignIn and SignUp:
import React from 'react';
import {Text} from 'react-native';

// import { Layout } from './styles';
import Background from '~/components/Background';

export default function SignIn() {
  return (
    <Background>
      <Text>SignIn</Text>
    </Background>
  );
}
A beautiful gradient screen should show up on your emulator/simulator or device.
Code: https://github.com/tgmarinho/gobarberRN/tree/aula-04-configurando-background
Lesson 05 - Input & Button
I created two global, isolated components in the components folder.
Both are used in SignIn and SignUp.
Note that I used React's forwardRef to forward the ref to the TIInput component and trigger focus programmatically, which we'll do in the next lessons.
Code: https://github.com/tgmarinho/gobarberRN/tree/aula-05-input-button
Lesson 06 - SignIn page
- I styled the SignIn page.
- Note that I used KeyboardAvoidingView instead of View, because on iOS when you tap an input it doesn't push the content up — it overlaps it and you can't see the input. So I used KeyboardAvoidingView with Platform to enable the padding behavior on that component. On Android this isn't needed — it handles it natively. See the implementation for details.
Code: https://github.com/tgmarinho/gobarberRN/tree/aula-06-pagina-signin
Lesson 07 - SignUp page
- Basically copy and paste from SignIn, add one extra field, and swap the labels.
Code: https://github.com/tgmarinho/gobarberRN/tree/aula-07-pagina-signup
Lesson 08 - Configuring the StatusBar
The Status Bar is the bar at the top showing battery, wifi, clock, etc. Here we set the background color to match the app and the content to white instead of the default black.
import React from 'react';
import { StatusBar } from 'react-native';
import Routes from './routes';

export default function App() {
  return (
    <>
      <StatusBar barStyle="light-content" backgroundColor="#7159c1" />
      <Routes />
    </>
  );
}
Code: https://github.com/tgmarinho/gobarberRN/tree/aula-08-configurando-statusbar
Lesson 09 - Accessibility tips
Here's a nice tip to save the user time and provide a great experience.
In SignUp we declare emailRef and passwordRef, and create a handleSubmit function:
import React, { useRef } from  'react';
...
const emailRef = useRef();
const passwordRef = useRef();

function handleSubmit() {}
...
Each ref goes to its respective component:
 <FormInput
  icon="person-outline"
  autoCorrect={false}
  autoCapitalize="none"
  placeholder="Nome completo"
  returnKeyType="next"
  onSubmitEditing={() => emailRef.current.focus()}
/>

<FormInput
  icon="mail-outline"
  keyboardType="email-address"
  autoCorrect={false}
  autoCapitalize="none"
  placeholder="Digite seu email"
  returnKeyType="next"
  ref={emailRef}
  onSubmitEditing={() => passwordRef.current.focus()}
/>

<FormInput
  icon="lock-outline"
  secureTextEntry
  placeholder="Sua senha secreta"
  returnKeyType="send"
  ref={passwordRef}
  onSubmitEditing={handleSubmit}
/>

<SubmitButton onPress={handleSubmit}>Criar</SubmitButton>
We use the onSubmitEditing={() => emailRef.current.focus()} prop to focus the next input. In this case the prop is on the user's Name input, so when they tap "next" on the keyboard, the email input gets focus. The returnKeyType="next" prop is the next button shown on the keyboard (depends on your phone's language settings).
On the last input we use returnKeyType="send", which changes the behavior to call the form-submit function via onSubmitEditing={handleSubmit}. So the create/sign-in button effectively becomes optional — if the user taps "send" on the keyboard, the form submits. That's an accessibility win. Of course we can't remove the button from the screen entirely, because not every user knows that trick.
The same thing was done on the SignIn screen — see the code.
Code: https://github.com/tgmarinho/gobarberRN/tree/aula-09-dicas-de-acessibilidade
Lesson 10 - Reactotron
In lesson 05 of this post https://www.tgmarinho.com/introducao-ao-react-native/ I walk through each step.
See the code at the link below.
Code: https://github.com/tgmarinho/gobarberRN/tree/aula-10-reactotron
Lesson 11 - Configuring Redux
- I grabbed the entire
storefolder from gobarber-web and pasted it insidesrc. - I removed
historyfrom the sagas, and also the toast — I used React Native's Alert to show feedback messages to the user. - In the configs I switched
process.env.NODEfor__DEV__. - Big benefit of Redux: we reused 99% of the application's logic when integrating with React Native — the same thing that worked on the web with React.
Code: https://github.com/tgmarinho/gobarberRN/tree/aula-11-configurando-redux
Lesson 12 - Connecting Redux
- I connected Redux so we can sign in and sign up new users. We dispatch actions that are intercepted by the saga, which calls the server and performs the login/registration. The server returns the success data, the reducers in the store get updated, and we show something visual or an alert to the user.
See the code.
In this post https://www.tgmarinho.com/arquitetura_flux/ I explain the same concepts.
Code: https://github.com/tgmarinho/gobarberRN/tree/aula-12-conectando-redux
Lesson 13 - Initial route
- After the user logs in they should be redirected to a new route (Dashboard).
I installed the react-navigation-tabs and react-native-reanimated libs, and ran pod install in the ios folder.
I created a pages/Dashboard/index.js file with an initial component using the rnfc snippet — this will be the Dashboard component the user sees after signing in.
In routes.js I imported react-navigation-tabs to use createBottomTabNavigator.
I also imported Dashboard.
I changed routes to export a function that takes a parameter, isSigned, with a default value of false.
Inside createAppContainer I created two groups — first Sign and then App. The user will be redirected to one or the other depending on their auth state:
{ initialRouteName: isSigned ? 'App' : 'Sign', }So they'll land on the requested route inside that group — SignIn, SignUp, or Dashboard if signed in.
Note that on the SignIn and SignUp screens I'm using createSwitchNavigator because I don't need any visual feedback on those routes. For Dashboard I'm using createBottomTabNavigator, which creates a button at the bottom of the screen with the route name (Dashboard). All of this can be customized — which is what we'll do in the next lesson. Cool that each screen can have its own navigation type via these groupings.
- routes.js:
import { createAppContainer, createSwitchNavigator } from 'react-navigation';
import { createBottomTabNavigator } from 'react-navigation-tabs';
import SignUp from './pages/SignUp';
import SignIn from './pages/SignIn';

import Dashboard from './pages/Dashboard';

export default (isSigned = false) =>
  createAppContainer(
    createSwitchNavigator(
      {
        Sign: createSwitchNavigator({
          SignIn,
          SignUp,
        }),
        App: createBottomTabNavigator({
          Dashboard,
        }),
      },
      {
        initialRouteName: isSigned ? 'App' : 'Sign',
      }
    )
  );
I created another App.js file inside src and renamed the index.js component to Index. I did this so I could import App inside index.js and, in App.js, access the store's reducers — to check whether the user is logged in and determine the value passed as a parameter to the route-creator function. Remember that the routes file now takes a function and returns another function — it became a Higher Order Component, another article, one more post on HOC. In src/index.js we import App and swap it for Routes, since Routes is now in App.js.
Basically this split between index.js and App.js happened because we couldn't access the store from inside index.js, where the Provider was being declared. So we separated these configs — now App lives inside the Provider and has access to the store's reducers.
- App.js:
import React from 'react';
import { useSelector } from 'react-redux';
import createRouter from './routes';

export default function App() {
  const signed = useSelector(state => state.auth.signed);

  const Routes = createRouter(signed);

  return <Routes />;
}
- index.js:
import './config/ReactotronConfig';
import React from 'react';
import { StatusBar } from 'react-native';
import { Provider } from 'react-redux';
import { PersistGate } from 'redux-persist/integration/react';

import { store, persistor } from './store';

import App from './App';
routes.js:
export default function Index() {
  return (
    <Provider store={store}>
      <PersistGate persistor={persistor}>
        <StatusBar barStyle="light-content" backgroundColor="#7159c1" />
        <App />
      </PersistGate>
    </Provider>
  );
}
Looking at the code in the link below, the diffs make the reason for the change easy to follow.
Code: https://github.com/tgmarinho/gobarberRN/tree/aula-13-rota-inicial
Lesson 14 - Styling the routes
- I styled the Dashboard and Profile routes (created this new component) and styled the tabs in the bottom menu.
Code: https://github.com/tgmarinho/gobarberRN/tree/aula-14-estilizacao-rotas
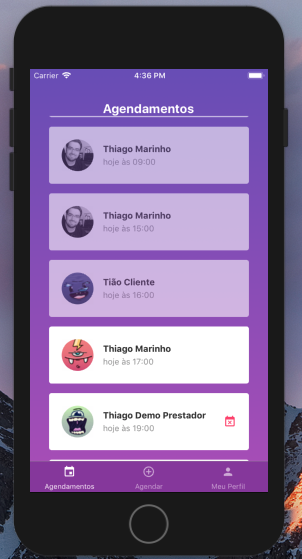
Lesson 15 - Appointment list
- I created a FlatList on the Dashboard to show appointments and styled the FlatList and its items by creating a new Appointment component.
Code: https://github.com/tgmarinho/gobarberRN/tree/aula-15-lista-de-agendamentos
Lesson 16 - Appointments from the API
- I fed the API data into the FlatList.
- I added the cancel-appointment method.
Code: https://github.com/tgmarinho/gobarberRN/tree/aula-16-agendamentos-api
Lesson 17 - Profile update
- I created, styled, and updated the Profile data via the API.
Code: https://github.com/tgmarinho/gobarberRN/tree/aula-17-atualizacao-perfil
Lesson 18 - Logout
- I implemented logout in the app.
Code: https://github.com/tgmarinho/gobarberRN/tree/aula-18-logout
Lesson 19 - Booking routes
- I created another route group called New that shows a
+icon on the TabBar with the label "Agendar". Tapping it starts the booking flow. This group has three stack routes so you can move forward and back through the steps: pick provider, pick date, and confirm the appointment. - I created the SelectProvider, SelectDateTime, and Confirm components but didn't style them — I'll do that in the next lessons.
Code: https://github.com/tgmarinho/gobarberRN/tree/aula-19-rotas-agendamento
Lesson 20 - Providers list
- I styled the SelectProvider component and used
navigation.navigateto go to the next screen with the selected provider.
Code: https://github.com/tgmarinho/gobarberRN/tree/aula-20-listagem-prestadores
Lesson 21 - Per-platform DatePicker
- I implemented the DatePicker for both Android and iOS.
Code: https://github.com/tgmarinho/gobarberRN/tree/aula-21-datepicker-por-plataforma
Lesson 22 - Picking a time slot
- I implemented the API call to fetch the provider's availability on the selected date and bring back the (available) time slots so the user can pick one and move on to the next screen (Confirmation).
Code: https://github.com/tgmarinho/gobarberRN/tree/aula-22-selecionando-horario
Lesson 23 - Confirming the appointment
- I styled the confirmation screen and implemented its behavior. When the user lands on this route, it receives the provider and time as parameters, displays the info on screen, and when they tap the confirm button the flow finishes and the appointment is created. To wrap things up, all that's left is refreshing the appointment list.
Code: https://github.com/tgmarinho/gobarberRN/tree/aula-23-confirmando-agendamento
Lesson 24 - Loading appointments
- To finish, I implemented the appointment reload. Every time a booking completes, the user is redirected to the Dashboard which shows the appointments. To reload the page, I used
withNavigationFocusfrom react-navigation so I have theisFocusedprop — every time the screen receives focus that value becomestrue, so when it'strueI reload, and I pass it as a dependency to theuseEffectthat hits the API.
I also added the resetOnBlur: true prop in routes.js, which clears the navigation stack — every time I tapped "Agendar" after a previous booking, it was going to the last screen, but I wanted to start from scratch. This prop fixed that.
Code: https://github.com/tgmarinho/gobarberRN/tree/aula-24-load-agendamento
The end!
NOTE: There are some implementation details left out that I should revisit in the future. For now this is it — take a look at the app's screens.
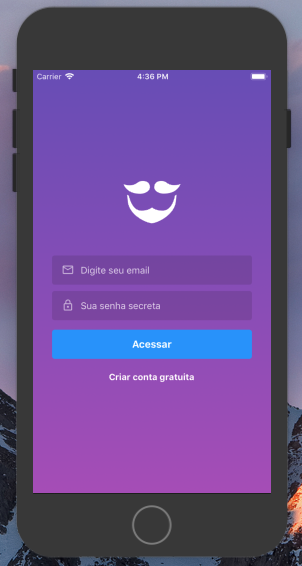
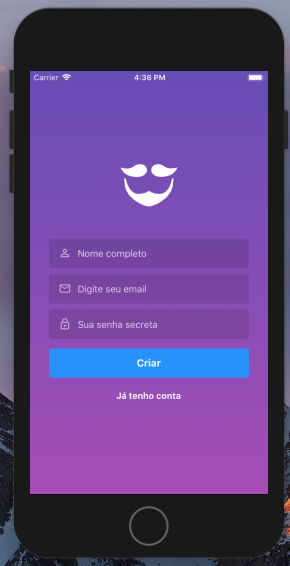
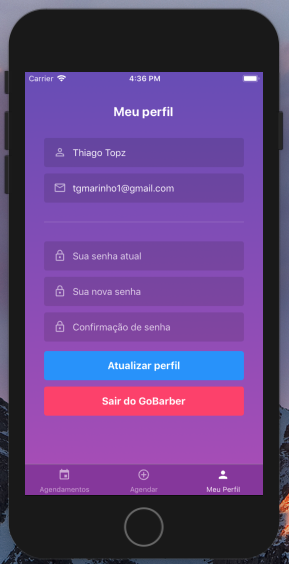
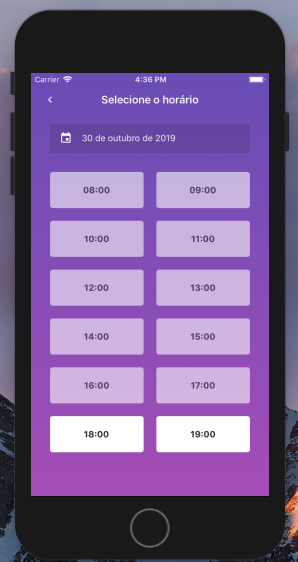
App screens:
- Login:
- Sign up:
- Profile:
-
Select Provider:

-
Select Time:
- Confirm Appointment:

- Appointments list:
Written by AI, reviewed by Thiago Marinho
October 30, 2019 · Brazil