Volumetric light, fog rings and 3D parallax: rebuilding the hero in pure CSS/SVG
Five techniques used to redesign the home hero — Grok-style volumetric beam, dissolved photo edges, organic fog ring, mouse-driven 3D tilt, and AI background removal — taught both as prompts and as code.
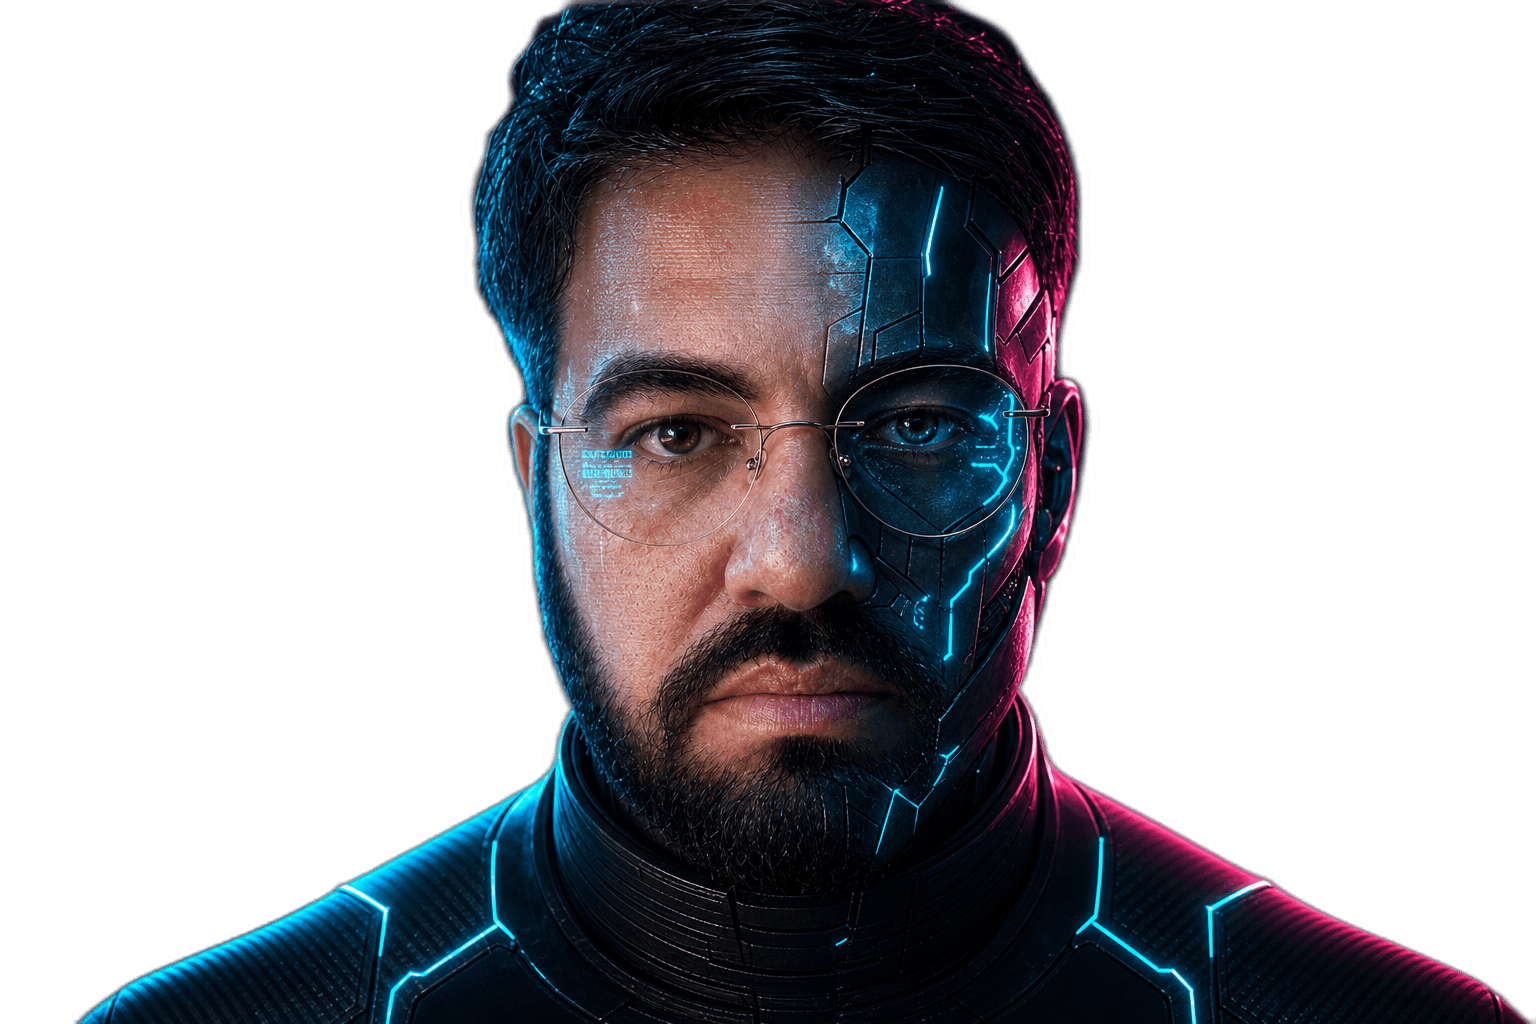
The home hero changed again. Last week it was a triptych of transparent portraits crossfading on a flat cyan/magenta blob. This week the blob is gone. In its place: a volumetric white beam coming from the right (à la grok.com), an organic fog ring dissolving the portrait edge into the cosmos, and a 3D parallax tilt that follows the cursor.
No WebGL. No 3D engine. No new assets. Pure CSS + SVG filters + a few CSS custom properties driven by requestAnimationFrame.
This post is two things at once: the prompt templates I used to drive an AI pair-programmer through this work, and the load-bearing code behind each technique. If you are an AI Product Engineer like me, both layers matter — knowing how to ask is half the implementation.
Live result: home page. PR: #36.
Why this matters
The portrait was technically fine but visually trapped in a rectangle. A photograph on a dark background always reveals itself eventually — there is a hard edge, a faint matte halo, a feeling of "sticker on canvas". The new pass attacks that exact problem from three angles: dissolve the edge (mask), paint vapor over it (fog ring), and recontextualize the whole figure in a beam of light (volumetric backlight). The parallax adds the final piece — the scene reacts to you, so it stops feeling like a still image.
For an AI Product Engineer, the hero is also a signal. If the first frame the visitor sees looks like a Bootstrap template with a stock photo, the rest of the portfolio does not get a chance.
1. Volumetric light beam in pure SVG/CSS
The prompt
"I like the volumetric light/smoke effect on grok.com. Recreate it in pure CSS/SVG — no assets, no WebGL, no Three.js. White, not tinted cyan. Should come from the right edge and bleed across roughly half of the hero."
The technique
Five overlapping radial-gradient blooms stacked at different offsets, sizes and blur radii, plus one SVG feTurbulence layer that adds organic fiber texture. The key insight is that one big bloom always looks like a flashlight. Stacking many at slightly different positions, sizes and animation phases creates a non-uniform, fibrous distribution that reads as volumetric haze.
// src/components/fx/volumetric-light.tsx — abridged
<div style={{
  top: "-30%", right: "-25%", width: "95%", height: "160%",
  background:
    "radial-gradient(ellipse 55% 55% at 80% 50%, " +
    "rgba(255,255,255,0.55) 0%, rgba(235,245,255,0.32) 18%, " +
    "rgba(186,230,253,0.14) 38%, rgba(125,211,252,0.06) 58%, transparent 78%)",
  animation: "vlight-breathe 11s ease-in-out infinite",
  filter: "blur(40px)",
}} />
// + 3 more blooms with different offsets, sizes, mix-blend-mode: screen
// + 1 linear-gradient sheet hugging the right edge
// + 1 SVG fiber layer (see below)
The keyframes are tiny — opacity 0.78 → 1.0 and a ~1.5% translate — but they break the staleness of a static gradient. Frame numbers are deliberately mismatched (11s, 14s, 17s, 21s) so the layers never sync.
The fiber layer — and the gotcha
To make the haze feel like actual atmosphere, I displace a radial gradient with feTurbulence + feDisplacementMap:
<filter id="fiber">
  <feTurbulence type="fractalNoise" baseFrequency="0.012 0.020" numOctaves="3" />
  <feDisplacementMap in="SourceGraphic" scale="14" />
  <feGaussianBlur stdDeviation="0.8" />
</filter>
The failure mode: my first attempt used scale="180" because intuitively "more displacement = more chaos = more interesting". Wrong. High-scale displacement on a smooth gradient produces ugly splattered blotches that look like coffee stains, not vapor. The fix was counter-intuitive: drop scale way down (14) so the displacement only nudges pixels by a hair, and let the soft turbulence pattern itself create the fibrous structure. Then a 0.8px gaussian blur sands off any residual harshness.
Also: the haze is white, not cyan. The earlier hero had a tinted accent blob; the volumetric version had to read as light, not as a colored aura. A barely-there cyan stop at the tail (rgba(125,211,252,0.06)) is the only nod to the palette.
Full source: src/components/fx/volumetric-light.tsx (160 lines).
2. Dissolving a photograph's rectangular edge
The prompt
"The portrait's rectangular edge is too obvious — make it dissolve sophisticatedly into the background. The figure should feel like it's emerging from the atmosphere, not pasted on top of it. 3D, robust, no visible matte line."
The technique
A radial-gradient mask with a long alpha tail. The naive version is a soft circle that goes from black to transparent over 20% of the radius — and it always shows a faint ring at the boundary. The robust version stretches the falloff across four stops with a deliberately long shoulder:
mask-image: radial-gradient(
  ellipse 56% 64% at 50% 44%,
  black 22%,
  rgba(0, 0, 0, 0.92) 48%,
  rgba(0, 0, 0, 0.55) 70%,
  rgba(0, 0, 0, 0.18) 86%,
  transparent 100%
);
Read the math: only the central 22% is fully opaque. By 48% we are already at 92% alpha (-8% — invisible to the eye), then 55% at 70% radius, then 18% at 86%, then zero. A long alpha tail beats a short one because the human eye locks onto rate of change. A sharp 20% falloff produces a perceptible halo line; a 78% gradual falloff is read as atmospheric absorption.
The ellipse is offset (at 50% 44%) because faces are top-heavy — the visual center of a portrait is above the geometric center.
Full source: src/components/fx/hero-portrait.tsx, the EDGE_FEATHER constant.
3. Organic fog ring around the silhouette
The prompt
"Even with the alpha mask there is still a residue at the boundary. Add a layer of vapor over the silhouette edge — paint smoke on top of the seam instead of trying to mask it perfectly."
The technique
This one is my favorite trick of the redesign. Instead of fighting the residual edge, you paint vapor on top of it. The recipe:
- A radial gradient whose center is transparent, mid-band is opaque, edge is transparent — i.e. a soft ring.
- Distort it with
feTurbulence+feDisplacementMap(herescale=32is fine because we want the displacement to fragment the ring into wisps). feGaussianBlur stdDeviation="1.4"to soften the broken edges.mix-blend-mode: screenso it only adds light, never darkens.
<radialGradient cx="50%" cy="46%" r="50%">
  <stop offset="0%"   stopColor="rgba(186,230,253,0)"     />
  <stop offset="56%"  stopColor="rgba(186,230,253,0)"     />
  <stop offset="70%"  stopColor="rgba(186,230,253,0.38)"  />
  <stop offset="84%"  stopColor="rgba(34,211,238,0.14)"   />
  <stop offset="100%" stopColor="rgba(34,211,238,0)"      />
</radialGradient>
The two 0% and 56% stops both at zero alpha create a fully transparent disc inside the ring — the face stays untouched. The ring band (70%–84%) hits the area where the photo edge was bleeding, and the turbulence shatters it into vapor.
Failure mode I avoided: tinting the fog with the full cyan accent. It made the portrait look like it was on a swimming-pool poster. The current mix is mostly pale #bae6fd with a sliver of #22d3ee at the very edge.
Full source: src/components/fx/hero-portrait.tsx, the <svg> block annotated "Dissolve fog".
4. Mouse-driven 3D parallax tilt (no re-renders)
The prompt
"The hero feels static. Add a subtle 3D parallax tilt that follows the cursor — perspective, rotateX/Y, a small translateZ — without causing React to re-render the portrait on every mousemove."
The technique
Three CSS custom properties (--tilt-x, --tilt-y, --tilt-z) on the root element, written directly from a requestAnimationFrame callback inside onMouseMove. React never sees the changes; the component does not re-render. The transform reads the custom properties so the browser composites the new frame for free.
const rafRef = useRef<number | null>(null);
const MAX_TILT = 7;

const handleMouseMove = (e: React.MouseEvent<HTMLDivElement>) => {
  if (reduceMotionRef.current) return;
  const el = rootRef.current;
  if (!el) return;
  const r = el.getBoundingClientRect();
  const nx = ((e.clientX - r.left) / r.width  - 0.5) * 2;
  const ny = ((e.clientY - r.top)  / r.height - 0.5) * 2;
  if (rafRef.current) cancelAnimationFrame(rafRef.current);
  rafRef.current = requestAnimationFrame(() => {
    el.style.setProperty("--tilt-x", `${(-ny * MAX_TILT).toFixed(2)}deg`);
    el.style.setProperty("--tilt-y", `${( nx * MAX_TILT).toFixed(2)}deg`);
    el.style.setProperty("--tilt-z", `${( nx * 8).toFixed(2)}px`);
  });
};
And on the element:
transform:
  "perspective(1400px) " +
  "rotateX(var(--tilt-x, 0deg)) " +
  "rotateY(var(--tilt-y, 0deg)) " +
  "translateZ(var(--tilt-z, 0px))",
transition: "transform 320ms cubic-bezier(0.16, 1, 0.3, 1)",
Three things to notice:
MAX_TILT = 7degrees. Anything over 10 looks like a novelty effect; 7 is the threshold where users feel depth without consciously noticing the tilt.perspective(1400px)is the focal distance. Smaller numbers make the tilt look exaggerated and "cartoon"; larger numbers look like a flat plane. 1400 is calibrated to a ~540px portrait.prefers-reduced-motionis honored viareduceMotionRef.current— the tilt simply does not engage for users who opted out.
Full source: src/components/fx/hero-portrait.tsx, handleMouseMove and the root <div style={{ transform: ... }}>.
5. AI background removal with rembg — model matters
The prompt that started it
"The background-removed portraits lost a lot of quality compared to the originals. They look pixelated and the helmet's outline is jagged."
The investigation
sips -g pixelWidth -g pixelHeight public/images/hero/portrait-agent-v2.png
# pixelWidth: 1536    pixelHeight: 1024

sips -g pixelWidth -g pixelHeight public/images/hero/portrait-agent-v2-removebg.png
# pixelWidth:  612    pixelHeight:  408
The previous removebg pass had downscaled the inputs to 612×408 — three times smaller than the source. Re-running at full resolution was step one. Step two was the model selection, which mattered more than I expected.
The technique
rembg (the AI background-removal CLI) ships several models. The default u2net is decent for everything; u2net_human_seg is trained specifically on human portraits and is usually the right pick. But for the agent portrait — a figure wearing a full helmet — u2net_human_seg produced artifacts around the helmet's silhouette, because the model "expects" to see hair/skin where there is metal.
Switching to isnet-general-use for the helmeted frame fixed it immediately. Final recipe:
uv tool install "rembg[cpu,cli]"

# Unobstructed human portraits
rembg i -m u2net_human_seg \
  public/images/hero/portrait-human-v2.png \
  public/images/hero/portrait-human-v2-removebg.png

# Non-human or heavily-occluded subjects (helmets, armor)
rembg i -m isnet-general-use \
  public/images/hero/portrait-agent-v2.png \
  public/images/hero/portrait-agent-v2-removebg.png
The output PNGs jumped from ~250 KB to ~1.4–1.8 MB, but next/image handles that — only the active frame is decoded and the per-pixel quality is now sharp at retina resolution.
Rule of thumb: for unobstructed faces use u2net_human_seg; the moment the subject is wearing a helmet, mask, costume, or you are masking a non-human object, fall back to isnet-general-use. And always check the actual pixel dimensions of your input with sips -g pixelWidth -g pixelHeight — a model can only be as good as the resolution you feed it.
What did not work
Three dead ends, in case you are tempted:
feTurbulencewithscale="180"— promised volumetric chaos, delivered coffee stains. The fix is the opposite of intuition: drop scale way down and let soft turbulence do the work.- Babylon.js / Three.js for the volumetric beam — would have worked, would have shipped 600 KB+ of bundle, would have needed shaders. Pure CSS + SVG ships zero extra bytes and runs at 60fps on every device. The constraint ("no WebGL") forced a better solution.
- React Three Fiber for the parallax tilt — same story. A 6-line
requestAnimationFramecallback writing CSS custom properties beats a full reconciler-driven scene graph for this use case.
The throughline: before reaching for an engine, ask whether the platform already gives you the primitive. Modern CSS + SVG filters cover an enormous surface area of "atmospheric" effects, and you keep prefers-reduced-motion, accessibility, and bundle weight on your side.
Putting it together
The full hero stack on the home page now is, top to bottom:
<VolumetricLight />— atmosphere behind everything.<ParticleField />,<BlackHole />,<RocketLaunch />— pre-existing primitives.<HeroPortrait />— the morphing portrait with alpha mask, fog ring, and 3D tilt.
Everything else is just composition. The components are small (the volumetric layer is 160 lines, the portrait is 350 with all the morph logic), and they share a vocabulary — cyan/magenta accents, soft cubic-bezier easing, screen blend mode, prefers-reduced-motion respect.
The lesson I keep relearning: the prompt and the code are the same artifact at different resolutions. Treat both with care.
PR: #36 — feat(hero): volumetric backlight + 3D parallax portrait.
Written by AI, reviewed by Thiago Marinho
May 11, 2026 · Brazil