Introduction to GraphQL with NodeJS and MongoDB
Get started with GraphQL on a Node.js backend backed by MongoDB — schema, resolvers, queries and mutations from scratch.

What is GraphQL?
GraphQL is an HTTP communication protocol created by Facebook. It carries some opinions and rules about how information flows between backend and frontend.
We still use HTTP requests, but we won't use something like Axios on the backend.
Benefits
The big benefit of GraphQL compared to REST is that we have a single endpoint (one route, e.g. http://localhost:5000/graphql).
In a REST application today we have one route per feature:
-
GET /users — list all users
-
GET /users/1 — return the user with that id
-
POST /users — create a user
-
PUT /users/1 — update the user with id 1
-
DELETE /users/1 — delete the user with id 1
With GraphQL this changes. We have just one route:
- POST /graphql
A single route to fetch, update, delete and create records — the whole CRUD.
On the POST method we can send a JSON body:
{
 query allUsers {
  users()
 }
}
And we'll get all users back.
In the same query we can include more than one query:
{
 query allUsers {
  users()
 }

 query allProducts {
  products()
 }
}
It will return users and products in one shot.
That's the first difference between REST and GraphQL — and a huge benefit.
Tell me more
GraphQL has a really nice Playground (Graphcool), similar to Insomnia or Postman. There's a screenshot at the end of the article.
Once the server is up with GraphQL we can open a UI playground in the browser, run queries there and copy them into our frontend code. It's very productive and great for testing and documenting the GraphQL API.
In GraphQL we don't need all the HTTP methods: GET, POST, DELETE and PUT.
So how do I tell the server what I want to do (delete, create, edit)?
In GraphQL we have three operations:
- Query
- Mutation
- Subscription
A Query is always used to fetch information — it never changes anything on the backend.
A Mutation is used to create, update or delete a record on the backend.
A Subscription is used to listen to information in real time — a real-time listener, with no need for socket.io.
The three operations are semantic, but the convention is: always use query to read, mutation to create/delete/update, and subscription to listen in real time.
Query and Mutation are the most common and the ones you'll start with, since together they let you build a basic-to-advanced CRUD.
We can run multiple updates and queries in the same backend request. Unlike a REST API — the how-to-graphql site shows this very well.
I can do:
{
 mutation updateUser {
  updateUser(id: 1) {
   name: "Thiago"
  }
  query users {}
 }
}
In the example above I'm updating the name of the user with id 1 to "Thiago" and, in the second call, fetching all users.
The frontend takes on more responsibility in the application — the backend ships the data, but the frontend can fetch it in different ways. A web frontend can fetch the data one way, a mobile app another, and GraphQL helps a lot here. Before, we had to write different controllers for mobile routes and web routes. With GraphQL you just change the query.
If you don't need a given field, just remove it from the query =)
It solves the overfetching problem nicely — we show on screen only what we need, not everything a REST API would return.
GraphQL also documents our backend, parameters, types, etc., thanks to the schema where we define the data types we expect to receive and send as parameters.
Let's see it in practice — Show me the Code
I create a folder in my workspace:
mkdir graphql-intro-blog && cd graphql-intro-blogStart a Node project:
yarn init -yOpen the VSCode editor:
code .We need to pick a framework to build the backend with GraphQL.
Usually to build a REST API or any other web project we use express, widely adopted in the community.
We could use express too, but with some extra features — so in this case we'll use graphql-yoga, which is a wrapper around express under the hood and ships with an integrated playground.
Add the dependency:
yarn add graphql-yogaCreate a src folder with a server.js file to configure the server.
Let's set up the server:
import { GraphQLServer } from  "graphql-yoga";

const server =  new  GraphQLServer({

});

server.start();
This already gets the server running. But we need to define the routes.
To define the application routes, let's create a schema.graphql inside the src folder.
I have two kinds of routes:
type Query {

}

type Mutation {

}
Query for fetching information, and Mutation when I want to change something.
schema.graphql is strongly typed — everything has a type.
For example, if I want a query that fetches users, I'd write:
type Query {
 users: [User!]
}

type User {
 id: ID!
  name: String!
  email: String!
}users: returns an array of User, and notice that User is a type — a shape describing how the data must arrive, with its types and names. These aren't necessarily the database types and variables; this is how the types must be exposed through GraphQL. Someone else will resolve that.
The exclamation mark ! says the field is required. The id will always be required.
We can also have a route that returns a single user:
type Query {
 users: [User!]
 user(id: ID!): User
}
See — I create the user query, which mandatorily takes an id as a parameter and returns a User.
Let's add one more route:
type Mutation {
 createUser(name: String!, email: String!): User
}
This time we create a mutation: when createUser is called, we mandatorily receive a name and email, and it returns a User. In this case a new user will be created with those parameters, and that same user will be returned.
Done — we've defined a rule. Now who's going to implement it, who resolves this thing? We'll see ahead.
I called them "routes" to map onto queries and mutations, but the actual name — with no analogy to REST — is Schema. This is a GraphQL schema. Let's get used to the vocabulary GraphQL gives us!
Now in server.js we have a typeDefs property that receives the schema we created:
const { GraphQLServer } = require("graphql-yoga");
const path = require("path");

const server = new GraphQLServer({
 typeDefs: path.resolve(__dirname, "schema.graphql")
});

server.start();
Back to the analogy: if typeDefs (or the schema) is the route, the Controller is missing. In GraphQL we have resolvers, which play the controller's role.
So let's create the resolver at src/resolvers.js:
module.exports = {

 Query: {

 },

 Mutation: {

 }

}
We have queries and mutations, so we'll create a resolver for query and another for mutation.
module.exports = {
 Query: {
  users: () => {},
  user: () => {}
 },

 Mutation: {
  createUser: () => {}
 }
};
For every query and mutation defined in the schema we must have a resolver. The schema only declares the type and is used for the consumer; the one that actually performs the lookup is the resolver. The resolver can be implemented any way you want — it can call an API, hit a Postgres or MongoDB database, etc. The cool thing is: the schema only defines what the user wants, and the resolver figures out how to bring it back matching the schema's rules and types. Note: the resolver can fetch tons of data, but what really reaches the user is only what's defined in the type (typeDef) — i.e. in schema.graphql. If the resolver returns extra fields not declared in the type, GraphQL won't forward them to the user. This is actually a common mistake when implementing the backend: you wire up the resolver to return a field but it never shows up on screen, and you realize you forgot to declare it in the schema. The schema is the rule and the rule is strict — "if it's there, it's there; if it's not, it's not!" Back to the code.
To test, let's create a static array of users inside resolvers.js.
const users = [{
  id: 1,
  name: "Thiago",
  email: "tgmarinho@gmail.com"
 },
 {
  id: 2,
  name: "Diego",
  email: "diego@rocketseat.com"
 }
];

module.exports = {
 Query: {
  users: () => {},
  user: () => {}
 },

 Mutation: {
  createUser: () => {}
 }
};
And the array shape matches the User type in schema.graphql.
To test, in our query we'll do:
Query: {
 users: () => users,
 user: () => users[0]
},

Mutation: {
 createUser: () => users[1];
}
This way, when users is called it returns the users array; when user is called it returns the first item; and when createUser is called we just return a user to check it's working. We'll evolve it gradually.
To test, just run from the project root:
node src/server.jsIf no errors, head to the browser.
I didn't define which port the server runs on, so it'll use the default port of the server we're using — port 4000. So in the browser:
The good-looking GraphQL Yoga playground will show up.
Just run the queries to grab id, name and email for all users — and if you don't want the email, drop it.
query {
 users {
  id name email
 }
}
To fetch the user with id:
{
 user(id: 1) {
  id name
 }
}
We can also call the mutations:
mutation {
  createUser(name: "Thiago", email: "tg@gmail.com"){
    id
    name
  }
}
See how fast and productive it is — much faster than testing a REST API with Insomnia.
Now let's level up and start saving to a database. In our case we'll use MongoDB with mongoose to make things easier.
I already have a MongoDB instance running in a Docker container.
I'll just start it: docker start mongo
And install the mongoose dependency:
yarn add mongooseThen connect to MongoDB in server.js:
const { GraphQLServer } = require("graphql-yoga");
const path = require("path");
const resolvers = require("./resolvers");
const mongoose = require("mongoose");

mongoose.connect("mongodb://localhost:27017/graphqlnode", {
 useNewUrlParser: true
});

const server = new GraphQLServer({
 typeDefs: path.resolve(__dirname, "schema.graphql"),
 resolvers
});

server.start();
Now I'll create the Mongoose schema for User in src/User.js:
const mongoose = require("mongoose");
const UserSchema = new mongoose.Schema({
 name: String,
 email: String
});

module.exports = mongoose.model("User", UserSchema);
And use it inside resolver.js:
const User = require("./User");

module.exports = {
 Query: {
  users: () => User.find(),
  user: (root, {
   id
  }) => User.findById(id)
 },

 Mutation: {
  createUser: (root, {
   name,
   email
  }) => User.create({
   name,
   email
  })
 }
};
I dropped the array, imported the User Model and used mongoose methods to query and create the user. That first root parameter is the GraphQL context, and the second parameter holds the arguments sent in queries and mutations that take parameters.
Just like that — the GraphQL API is ready to feed user data to the frontend.
Now just run the server and open localhost to test. The first query will return an empty array since the database is empty.
Use the mutation to create new users and then run your queries.
We can also create named queries:
query myNamedQuery {
 users {
  id name email
 }
}
mutation createNewUser {
 createUser(name: "Joao", email: "jo@gmail.com") {
  name id
 }
}
Source code: https://github.com/tgmarinho/graphql-node-blog
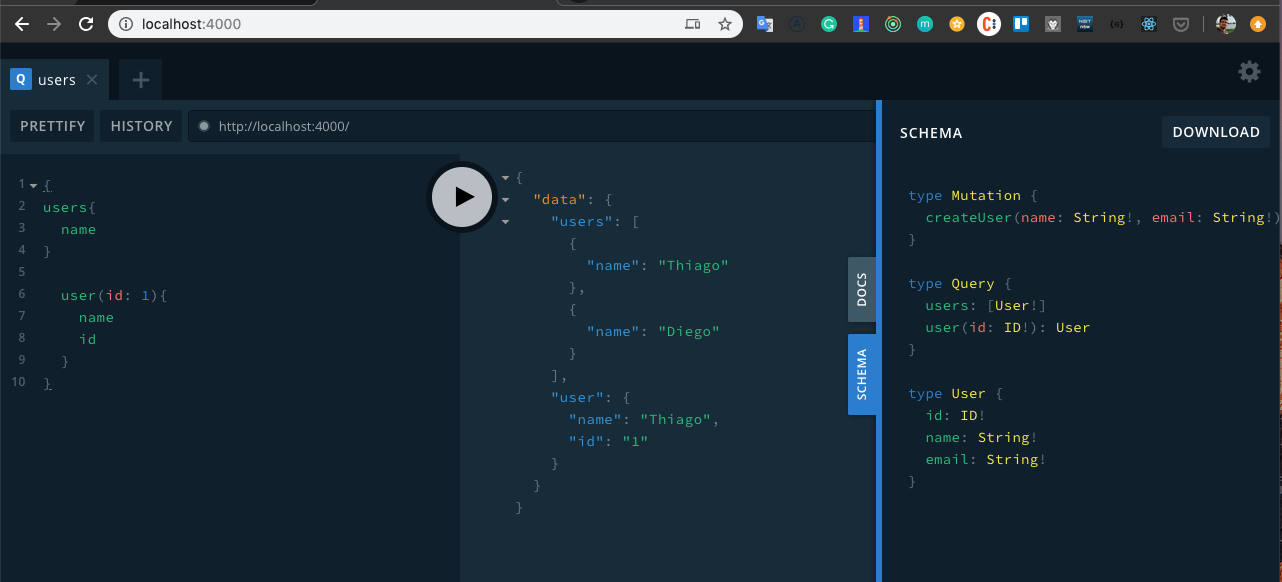
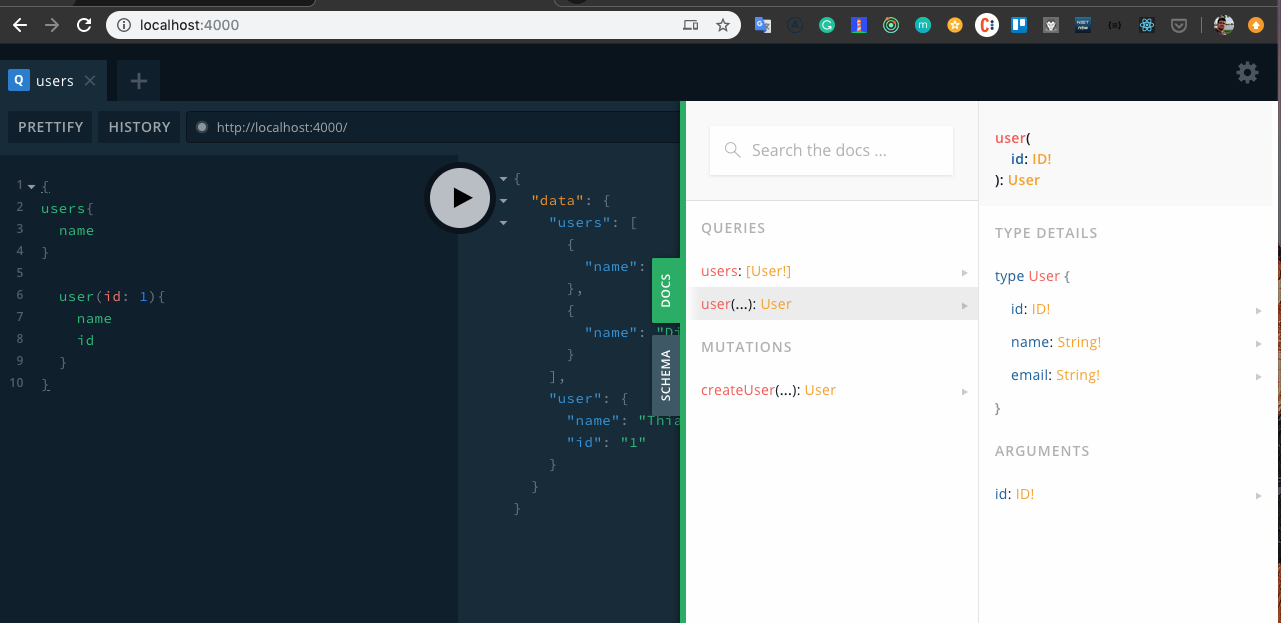
Screenshots of Graphcool running on my machine
- Notice the documentation and the schema it shows us
Want more?
Reference
Thanks!
Written by AI, reviewed by Thiago Marinho
November 9, 2019 · Brazil